
RETECHNOLOGY PREMIUM MARKETPLACE RELATED PRODUCTS | WEBINARS | SPECIAL OFFERS


You are viewing our site as an Agent, Switch Your View:
Agent | Broker Reset Filters to Default Back to ListHow to Shoot Real Estate So It Attracts More Buyers
September 16 2020
Looking to up your real estate photography game? In this article, we are going to talk through all the crucial elements that go into effectively shooting a property from start to finish. Even if you're new to real estate photography and have never shot a property in your life, this blog will help get you started with some really simple and easy-to-understand tips and tricks.
Not only will we go into how to take that perfect image, we will also give you some recommendations on the right gear to purchase along with camera settings, bracketing, property preparation, and the all-important image enhancement and editing.
Step One: What Camera and Tripod to Buy
Finding the perfect camera to get started is easier said than done. There are plenty of options on the market and it can get pretty overwhelming if you're new to property photography.
For this tutorial, we have used the Nikon D7200. However, this model is discontinued with the D7500 now the next model up from Nikon. This fantastic camera will set you back about $1,100 (at the time of writing this blog) and is a great all-around option for real estate photographers.
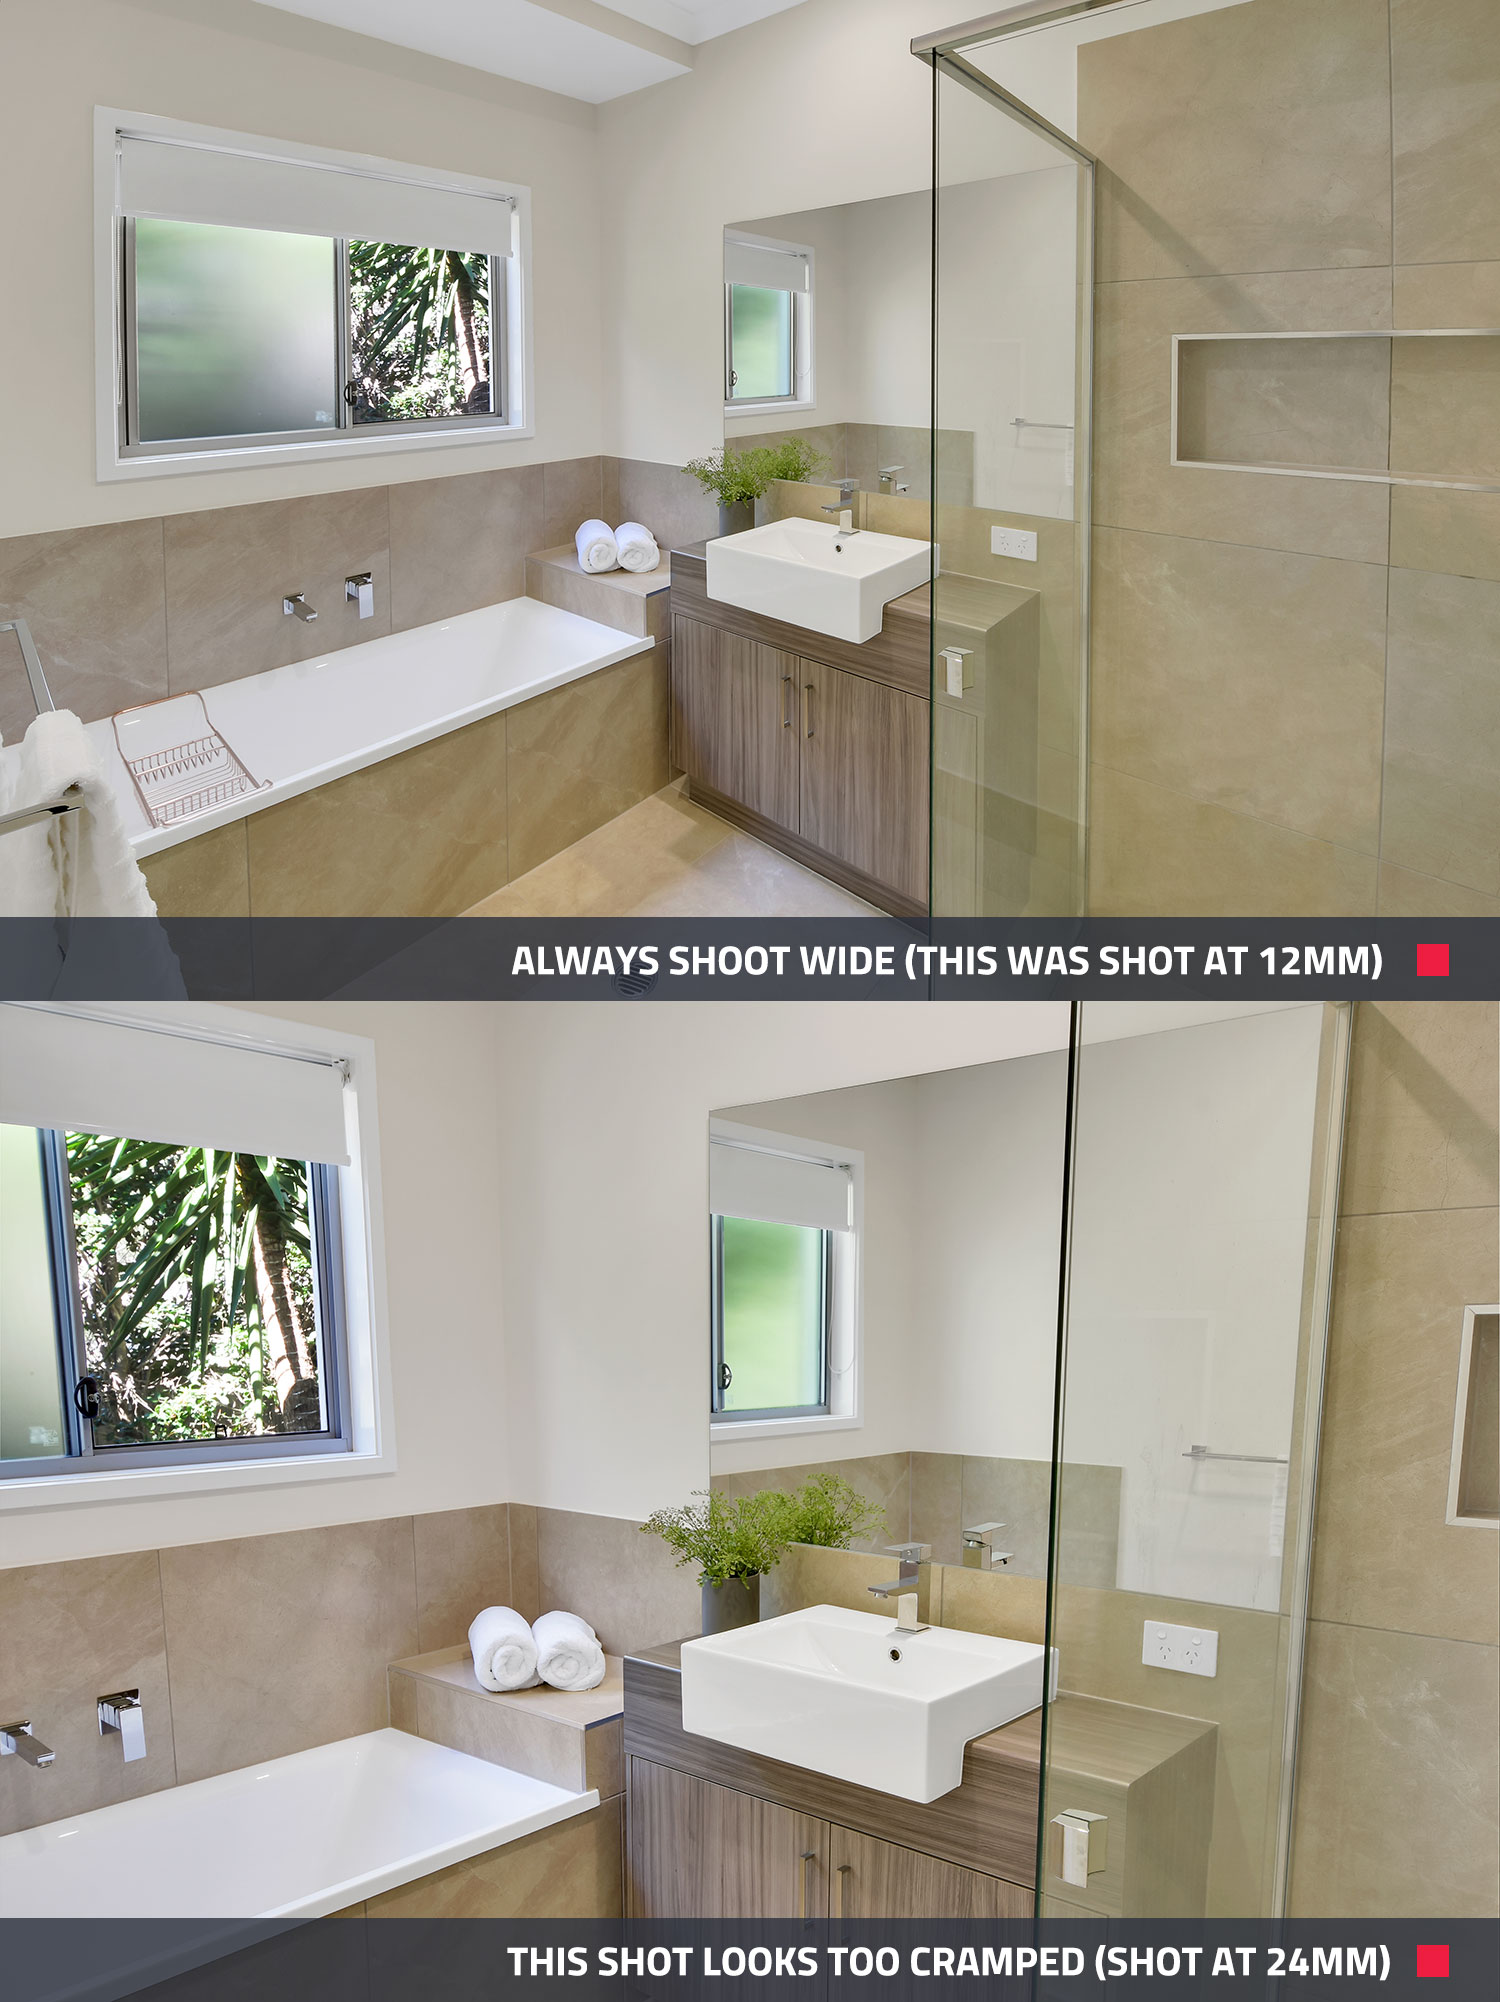
We recommend using this camera with the Nikon 10-24mm lens (approximately $900), which will allow you to take wide shots and capture the perfect amount of the space. For the majority of the time, you should aim to shoot at approximately a 12mm focal length, as we are using the APS-C camera, which is the equivalent of shooting at 18mm on a full-frame camera configuration. It's important to note that if you shoot too wide, the images may not display the property properly.
We also use the Nikon SB-5000 flash to fill out dark shadows while still producing an accurate color in the finished product. To ensure the shots are steady and perfectly angled, we use the Manfrotto tripod and a Neewer Trigger Ball Head. If this set-up is a little out of budget, we recently wrote a blog on how to shoot real estate using an iPhone 11.
Step Two: What Camera Settings Should You Use
There are countless settings that we could go into and many of them may depend on the exact type of camera you are using. Instead, we will detail here the main camera settings we use and recommend.
Set your ISO to 100, which will allow you to capture the highest quality of image. We also recommend shooting in Aperture priority with the aperture set at f8 or above to ensure a sharp image every time.
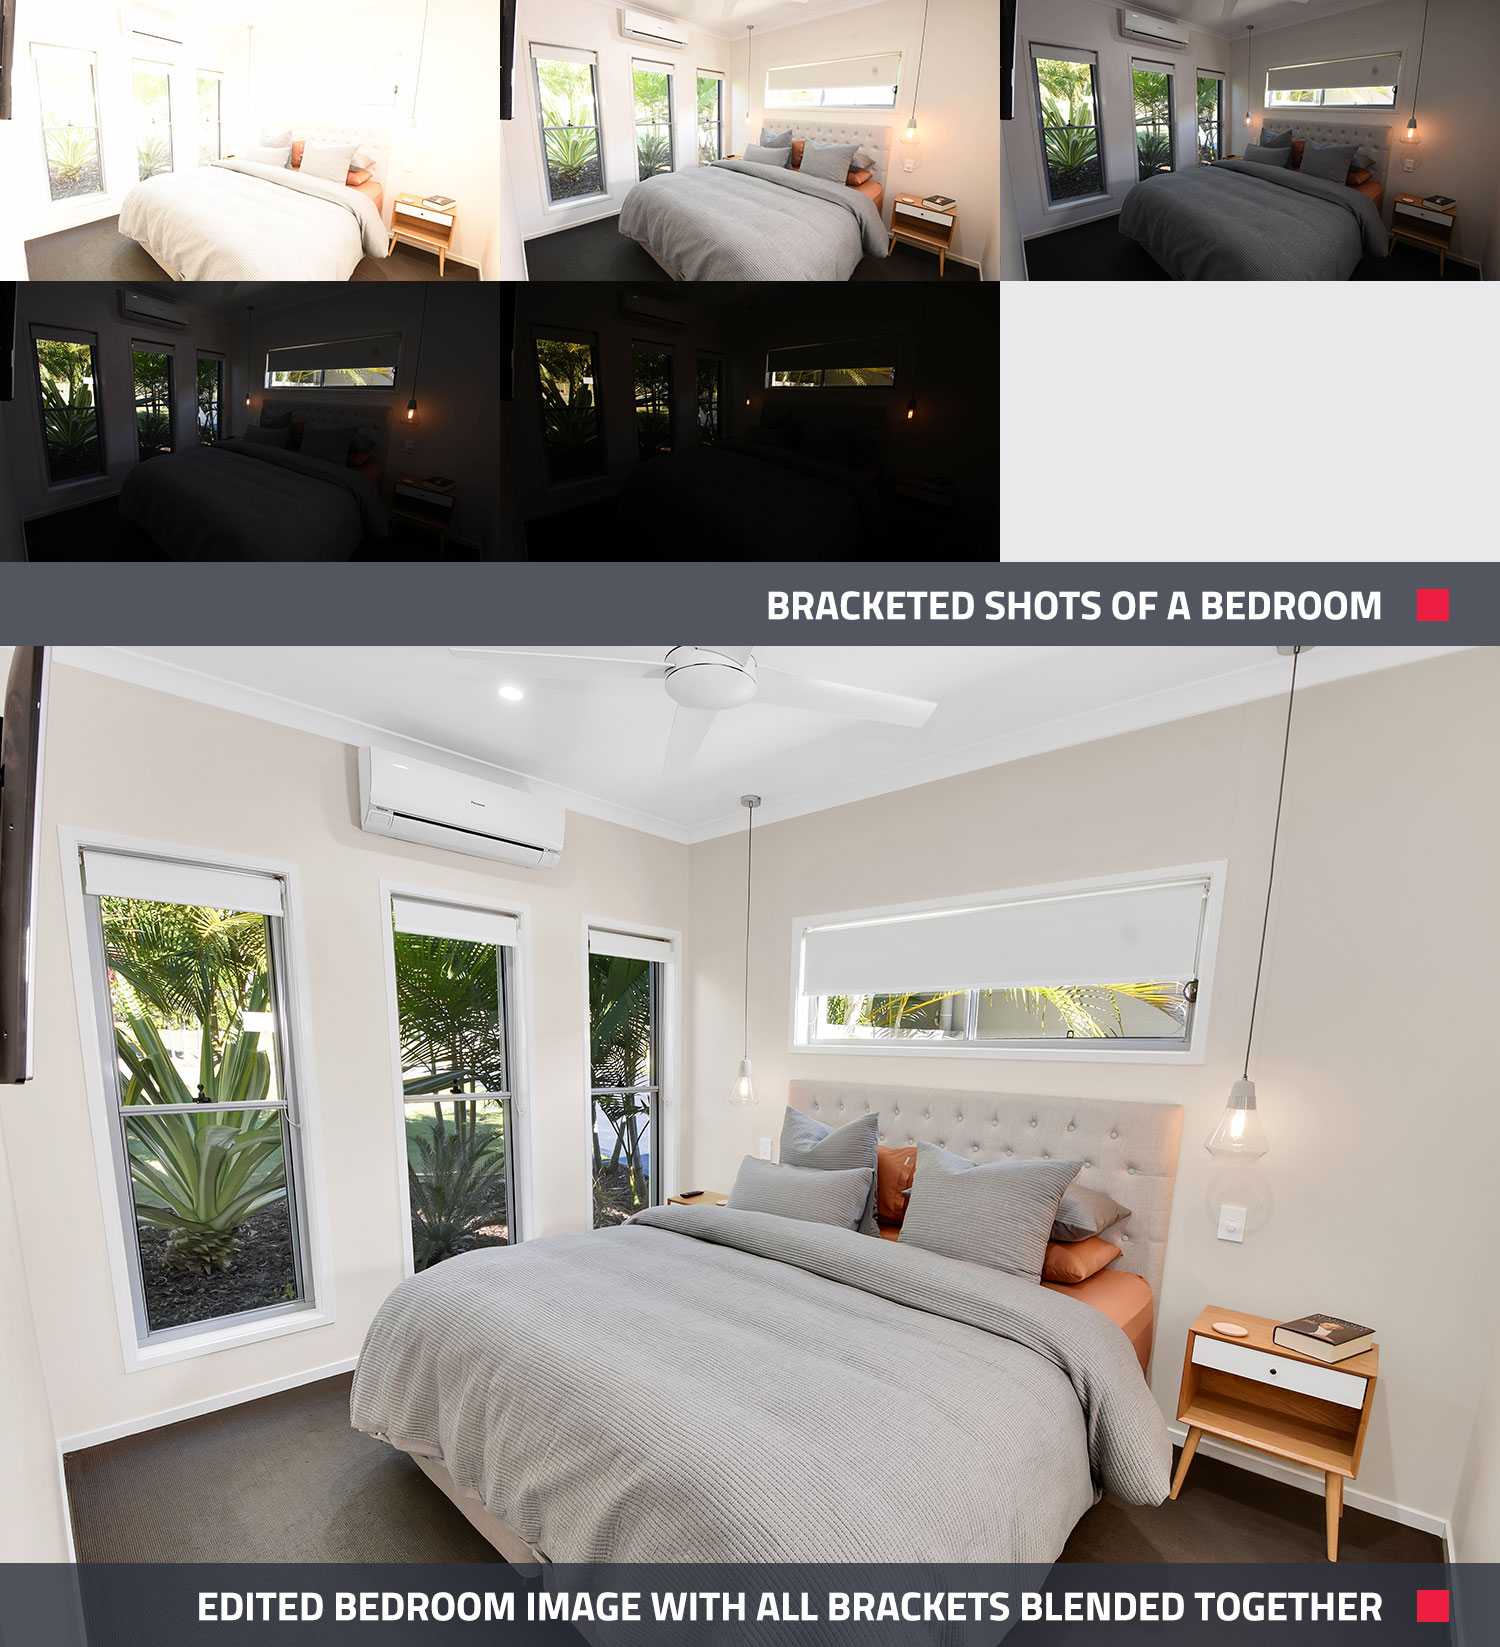
Always be sure to shoot on auto-bracketing mode. This is where your camera will shoot five separate brackets at two exposure values of difference each time you hit the shutter button. Each of these images can then be blended together during the editing phase to produce a dynamic finished product that highlights every detail in the room. If you'd like to learn more about bracketing, you can take a look at one of our previous blogs here.
Step Three: How to Prepare the Property
Preparing the property is an essential step in effective real estate photography. While every property is different, there are some easy-to-remember tips and tricks when preparing a property. If you'd like a handy guide to help you remember, you can download our Pre-Photography Checklist.
Always remove any unnecessary clutter like shampoo bottles and soaps in the bathrooms, bins in the kitchen, kid's toys and tissue boxes etc. It's also always a good idea to straighten the tapware, cushions, towels, bedspreads and furniture to ensure a neat-and-tidy appeal.
By opening all the external doors, you can create a more spacious feel and flow to the shot, and the same goes for the window blinds and curtains. Switch on all the lights to add extra appeal to the space and don't forget about the range hood, kitchen pendant lights and bedside lamps.
Step Four: How to Shoot the Property
When it comes to real estate photography, the aim is to shoot quickly and efficiently. Remember, this is someone's home and tenants or homeowners aren't going to be too keen for you to spend all day walking around their house.
Start at one end of the home, line up the shot, half-press the shutter so it auto-focuses and then press the shutter. Providing you have set up your bracketing settings, the camera will then take five shots automatically. Move through the property, making sure to capture all the key rooms, including the kitchen, bedrooms, living spaces and bathrooms. If the bathroom is tight, you may need to shoot slightly wider to capture the layout of the room.
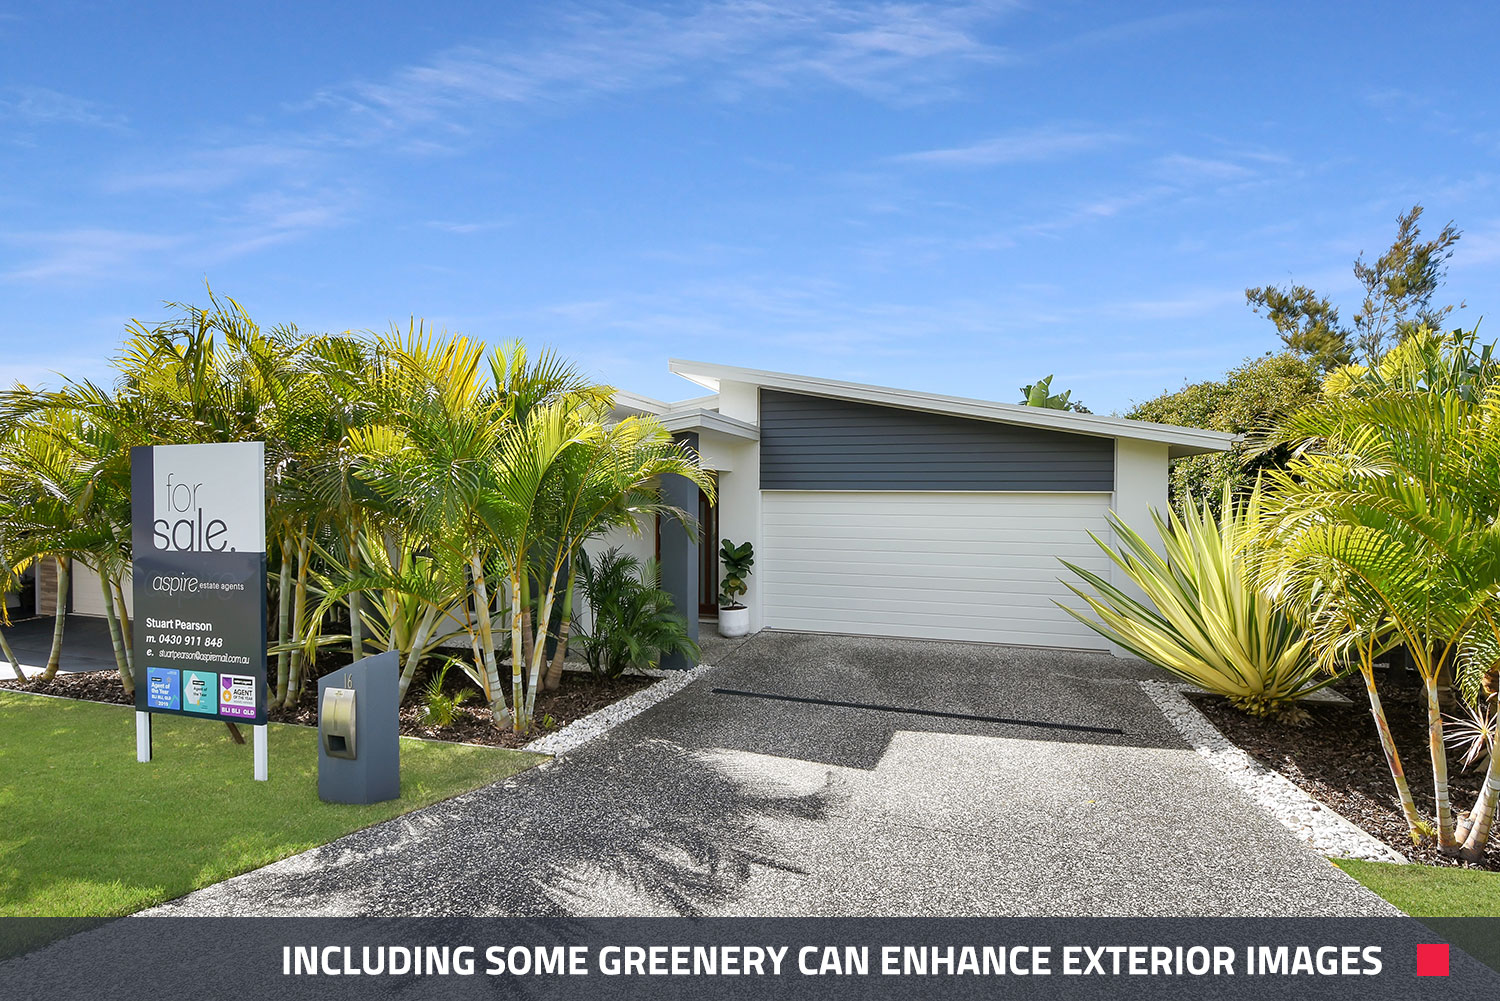
When it comes to the exteriors, try to include some foliage in your shoot wherever possible. This will give you a bit more pop in the final image.
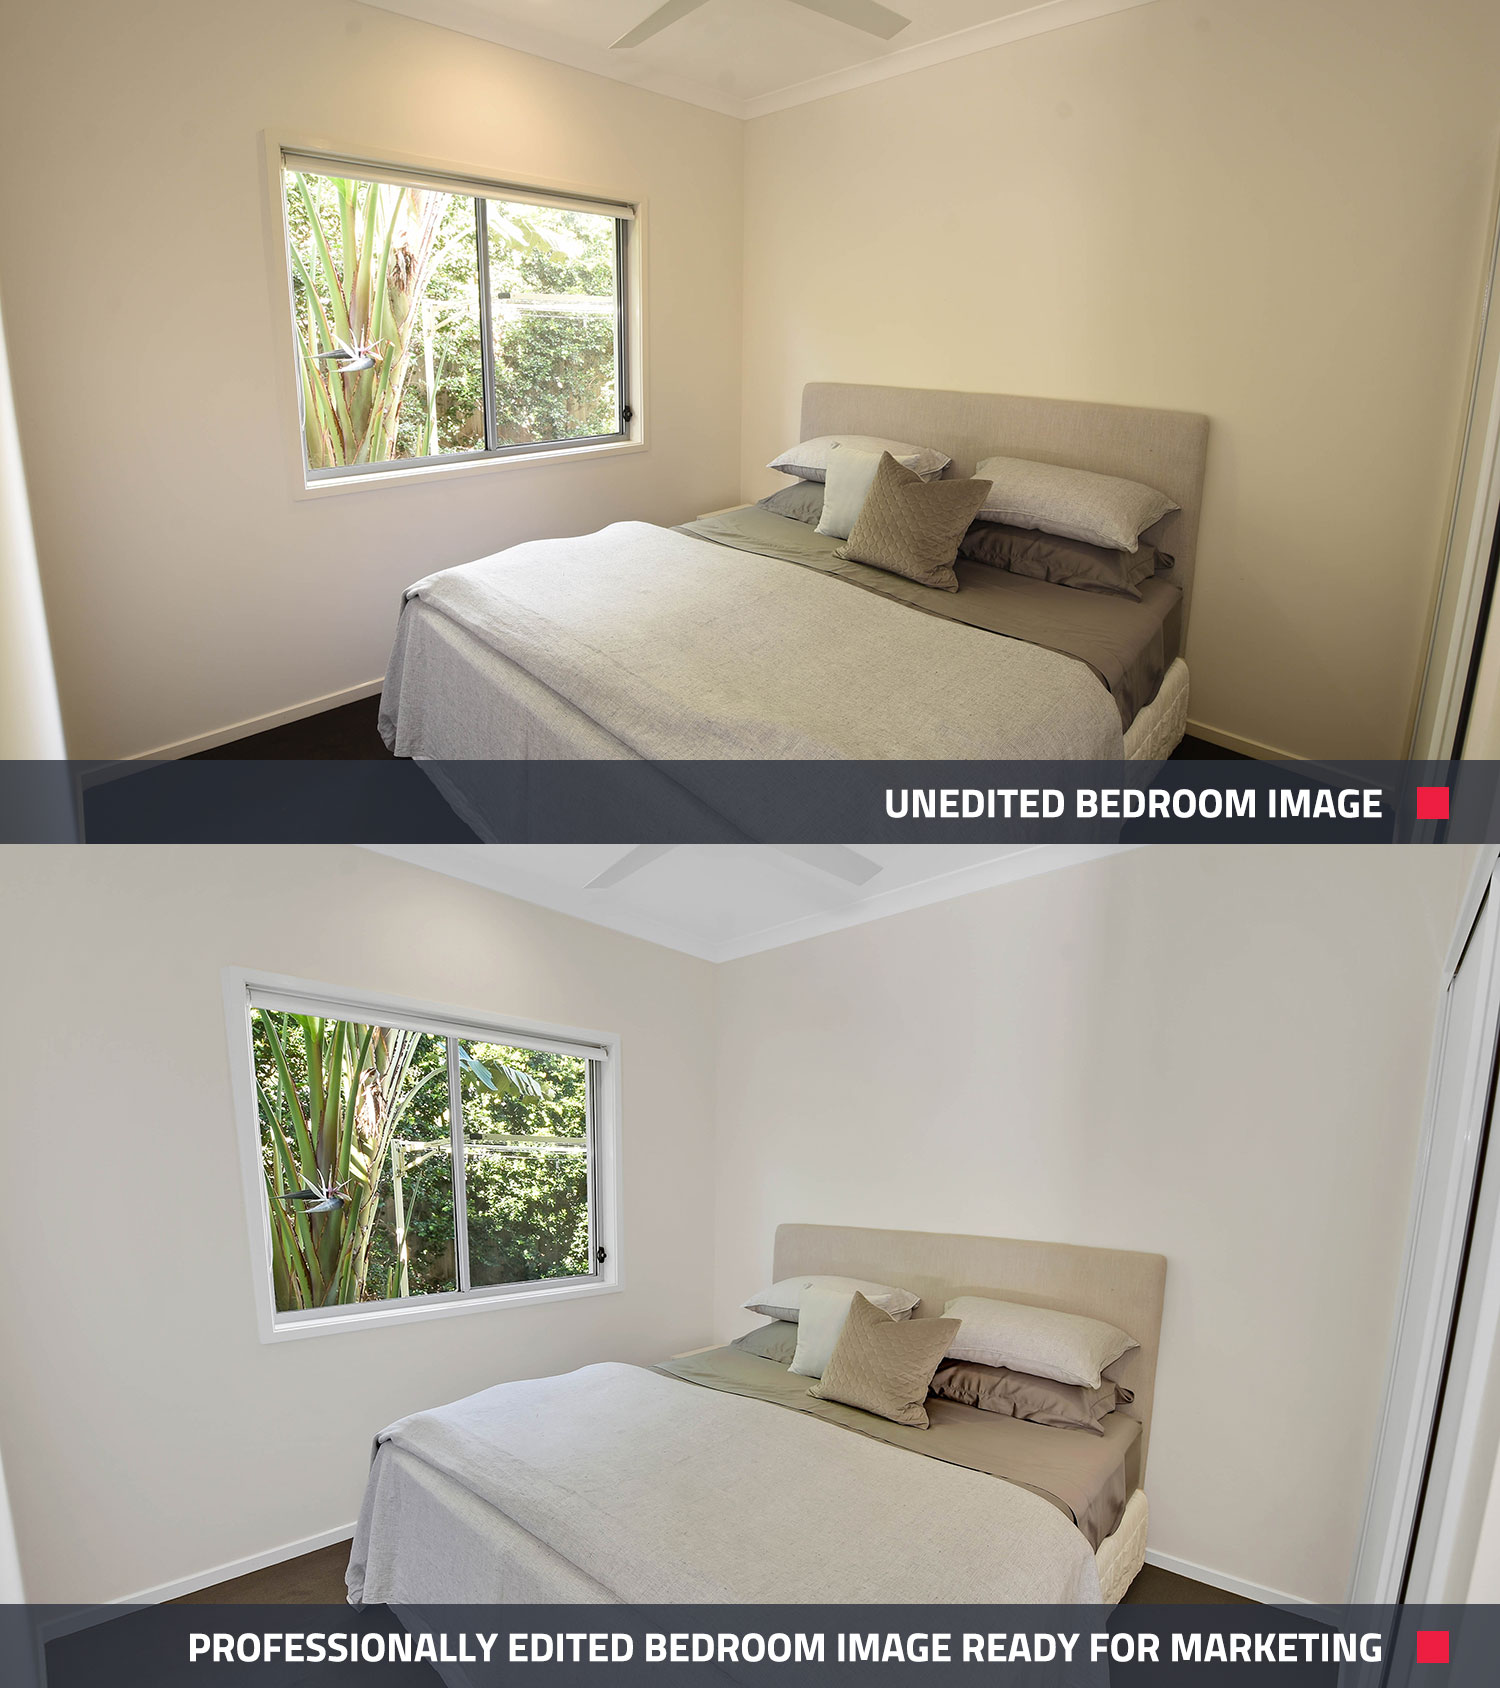
Step Five: How to Get Your Images Edited
We offer editing via our Image Enhancement HDR bracketed function for as little as $1.60 per image. To get started, all you have to do is sign up at BoxBrownie.com and log in to your dashboard.
Select Image Enhancement and then the HDR Bracketed Images option. Click to start a new job and then simply enter your new Job Title, your number of total outputs and then upload your images from the property shoot. That's it. It really is as simple as that.
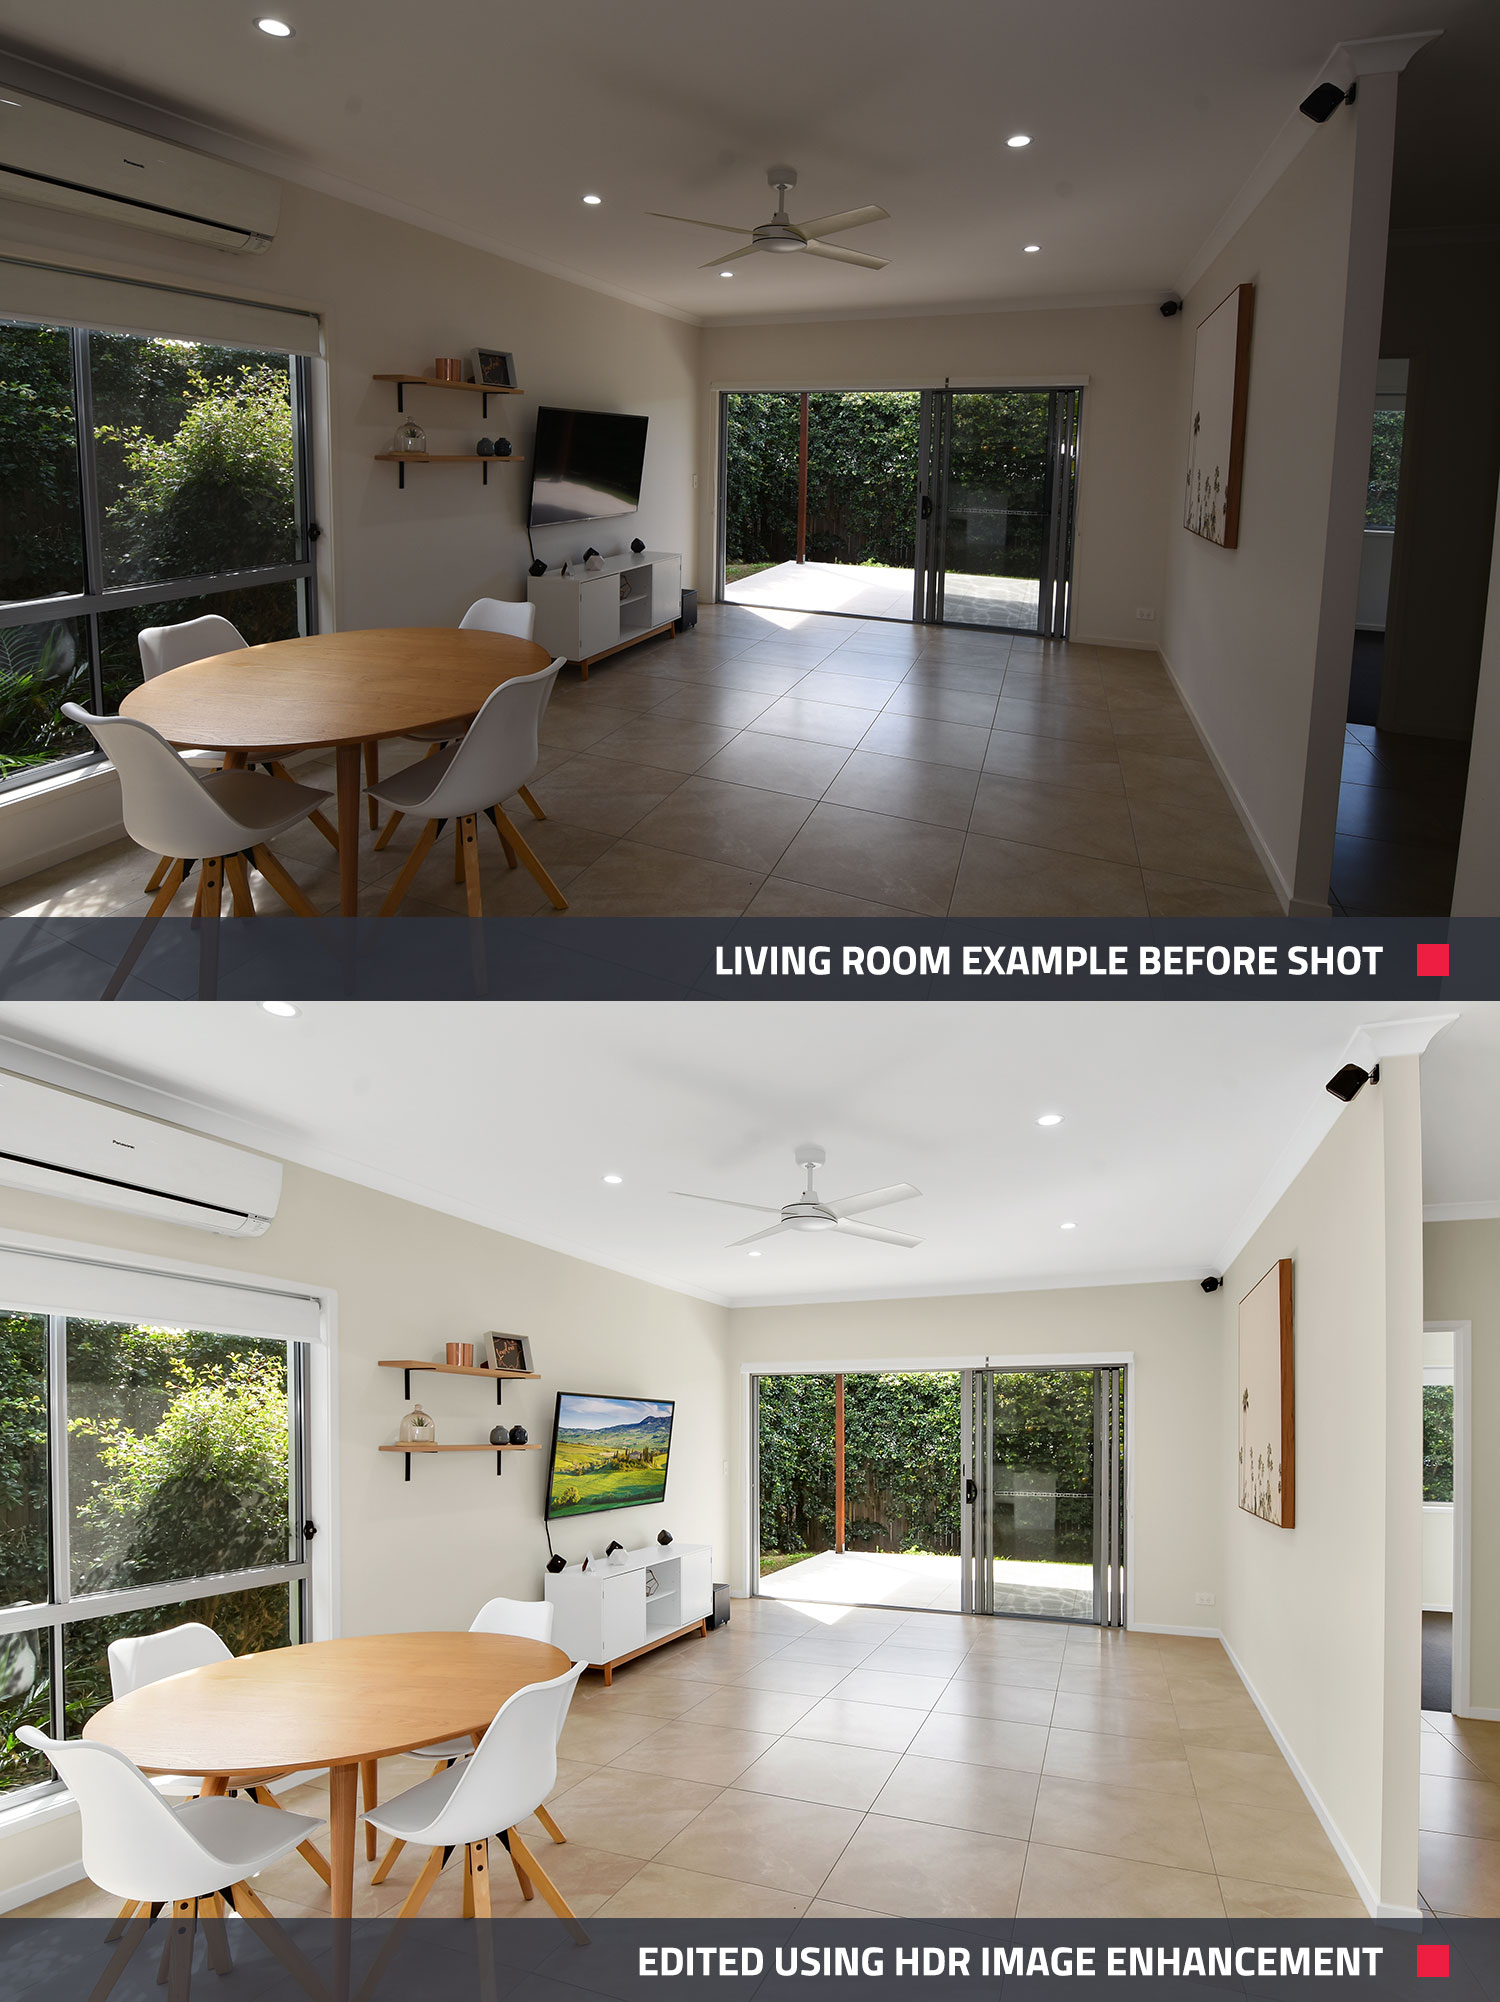
Within 24 hours, you will receive your professionally edited images, ready for marketing your listing.
Conclusion
Shooting a property may seem like a daunting task, especially if you're new to real estate photography—but it doesn't have to be that way. With these simple steps, some correct bracketing, and the help of our professional editors, you too can produce outstanding images that will take your property marketing to the next level.
BoxBrownie.com is currently offering a free virtual staging edit (valued at $32) to every RE Technology member (new accounts only). This offer expires on September 18. Click here to claim your free virtual staging edit.
To view the original article, visit the BoxBrownie.com blog.